.jpg)

 |
Penjelasan |
|---|---|
| Title | Create a Panoramic Image Using Photoshop Elements 4 |
| About | Image Editing |
| Short Description | Swap and Add Colors in Your Photographs Use the painting tools in Photoshop Elements to change or add colors in your photographs. how to replace existing colors in images. how to add colors to black-and-white images |
| Full Description | Please read the full article Below me. |
Tools: Photoshop Elements
Materials: Your photo

In this project, you'll learn two different techniques. Working with the Paintbrush tools, you'll learn how to add colors to black-and-white images; then we'll show you how to replace existing colors in images with completely new ones.
In the first technique, we'll demonstrate how to add colors to either a color or a black-and-white image. You can use this method to colorize old photos or to just have fun with new ones!
 Get started.
Open your image in Photoshop Elements in the Standard Edit mode.

 Remove the current colors.
Unless the image you are using is already a black-and-white image, you will want to remove the colors. To do so, choose Enhance > Adjust Color > Remove Color.

Note: If you are working on a black-and-white image, you'll need to change the image mode to one that allows colors. Choose Image > Mode > RGB Color. This allows you to colorize the image.
 Create a new layer.
If the Layers palette is not open, click the Layers arrow to open it or choose Window > Layers. Click the New Layer button (
 ) at the top of the palette.
 Set layer options.
You should always give your layers a descriptive name. This way, even if your file has 50 layers, you can easily identify the one you want. Double-click in the Name field inside the new layer and type colors as the layer name.
Next, you will set the layer blending mode. The blending modes are located on the pop-up menu next to the opacity settings on the Layers palette. Click the menu and select Color. This setting allows the image to show through the color.

 Pick your paintbrush.
Select the Paintbrush tool (
 ) from the Photoshop Elements toolbox. From the Brushes pop-up menu on the options bar, select a medium-size brush for painting. The brush settings appear on the options bar after you select a brush. Note: The brush size also depends on the resolution of your image. A medium-sized brush for a 300-dpi image will be a large brush for a 72-dpi image.
 Choose your paint color.
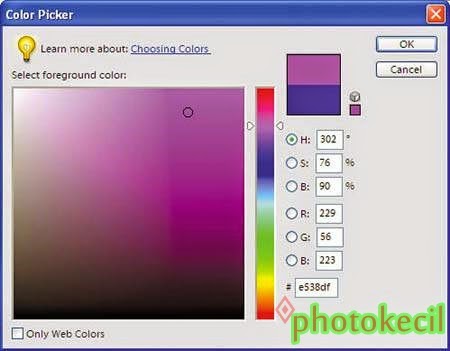
At the bottom of the toolbox, click the Set Foreground Color swatch. Click in the square box to open the Photoshop Elements Color Picker. Use the vertical sliders to find the color area you desire. Then, use the circle to select the exact color you want. Alternatively, choose Window > Color Swatches and click the color you want. You should see the color you've selected in the square in the upper right of the Color Picker box.
 Begin painting.
Select your new layer and zoom in on the area you want to paint. Drag your paintbrush over the area to apply the new color. If you find that your brush is too large, too small, or wrong in some other way, go back to the Brushes menu and select a new brush.

 Make corrections.
It happens to the best of us: we make a mistake or change our minds. There are three ways to deal with this. If you just applied the action, press Ctrl+Z. If you want to undo more than one step, go to the Undo History palette. This nifty palette allows you to go back up to 20 steps! The final option for correcting a mistake is to use the Eraser tool (
 ). This tool has three forms: Eraser, Background Eraser, and Magic Eraser. Here, just choose the plain Eraser tool. After you have chosen the eraser mode, you can choose Brush, Pencil, or Block. Specify a setting that complements your current paintbrush and drag over the appropriate area.
 Experiment with color.
To add more colors, just go back to step 6 and choose a new color.
Create new layers for your new colors and experiment with different layer modes and paintbrushes.
 Save a working version.
To save your new version with layers, choose File > Save As, rename the file, and save the file in Photoshop format. If you want to save a single-layer (flattened) version, choose File > Save As, rename the file, and deselect the Layers check box. The Save a Copy check box will automatically be selected. Rename your file and save it.
Next Tips is about Replace existing image colors with completely new ones with Adobe Photoshop Elements


 BELUM TAU CARA CEK RESI JNE?
0 komentar:
Post a Comment
Untuk Berkomentar di Blog ini, silahkan berkomentar dengan rapi, pertanyaan baru sekaligus tertib, supaya enak dibaca oleh kita semua.. karena dengan pertanyaan baru akan dapat menambah pengetahuan kita akan hal-hal yang belum kita ketahui..
do not Spamming